
Your motorcycle’s brakes are your lifeline on the road. Neglecting them can lead to accidents, especially on Uganda’s challenging terrain.
Here’s a quick guide to ensure your brakes are safe and reliable:
- Warning Signs: Strange noises, reduced braking power, or soft brake levers mean it’s time for a check.
- Visual Inspection: Look at brake pads (minimum 1.5-2mm thickness), rotors (no cracks or warping), and brake lines (no leaks or damage).
- Brake Fluid: Keep fluid levels above the MIN mark and replace dark or contaminated fluid.
- Performance Test: Verify firm brake lever/pedal feel and test braking at low speeds.
When in doubt, seek professional help – especially if you notice grinding noises, fluid leaks, or vibrations. Regular maintenance can save you money and, more importantly, lives. Keep your bike safe for every ride!
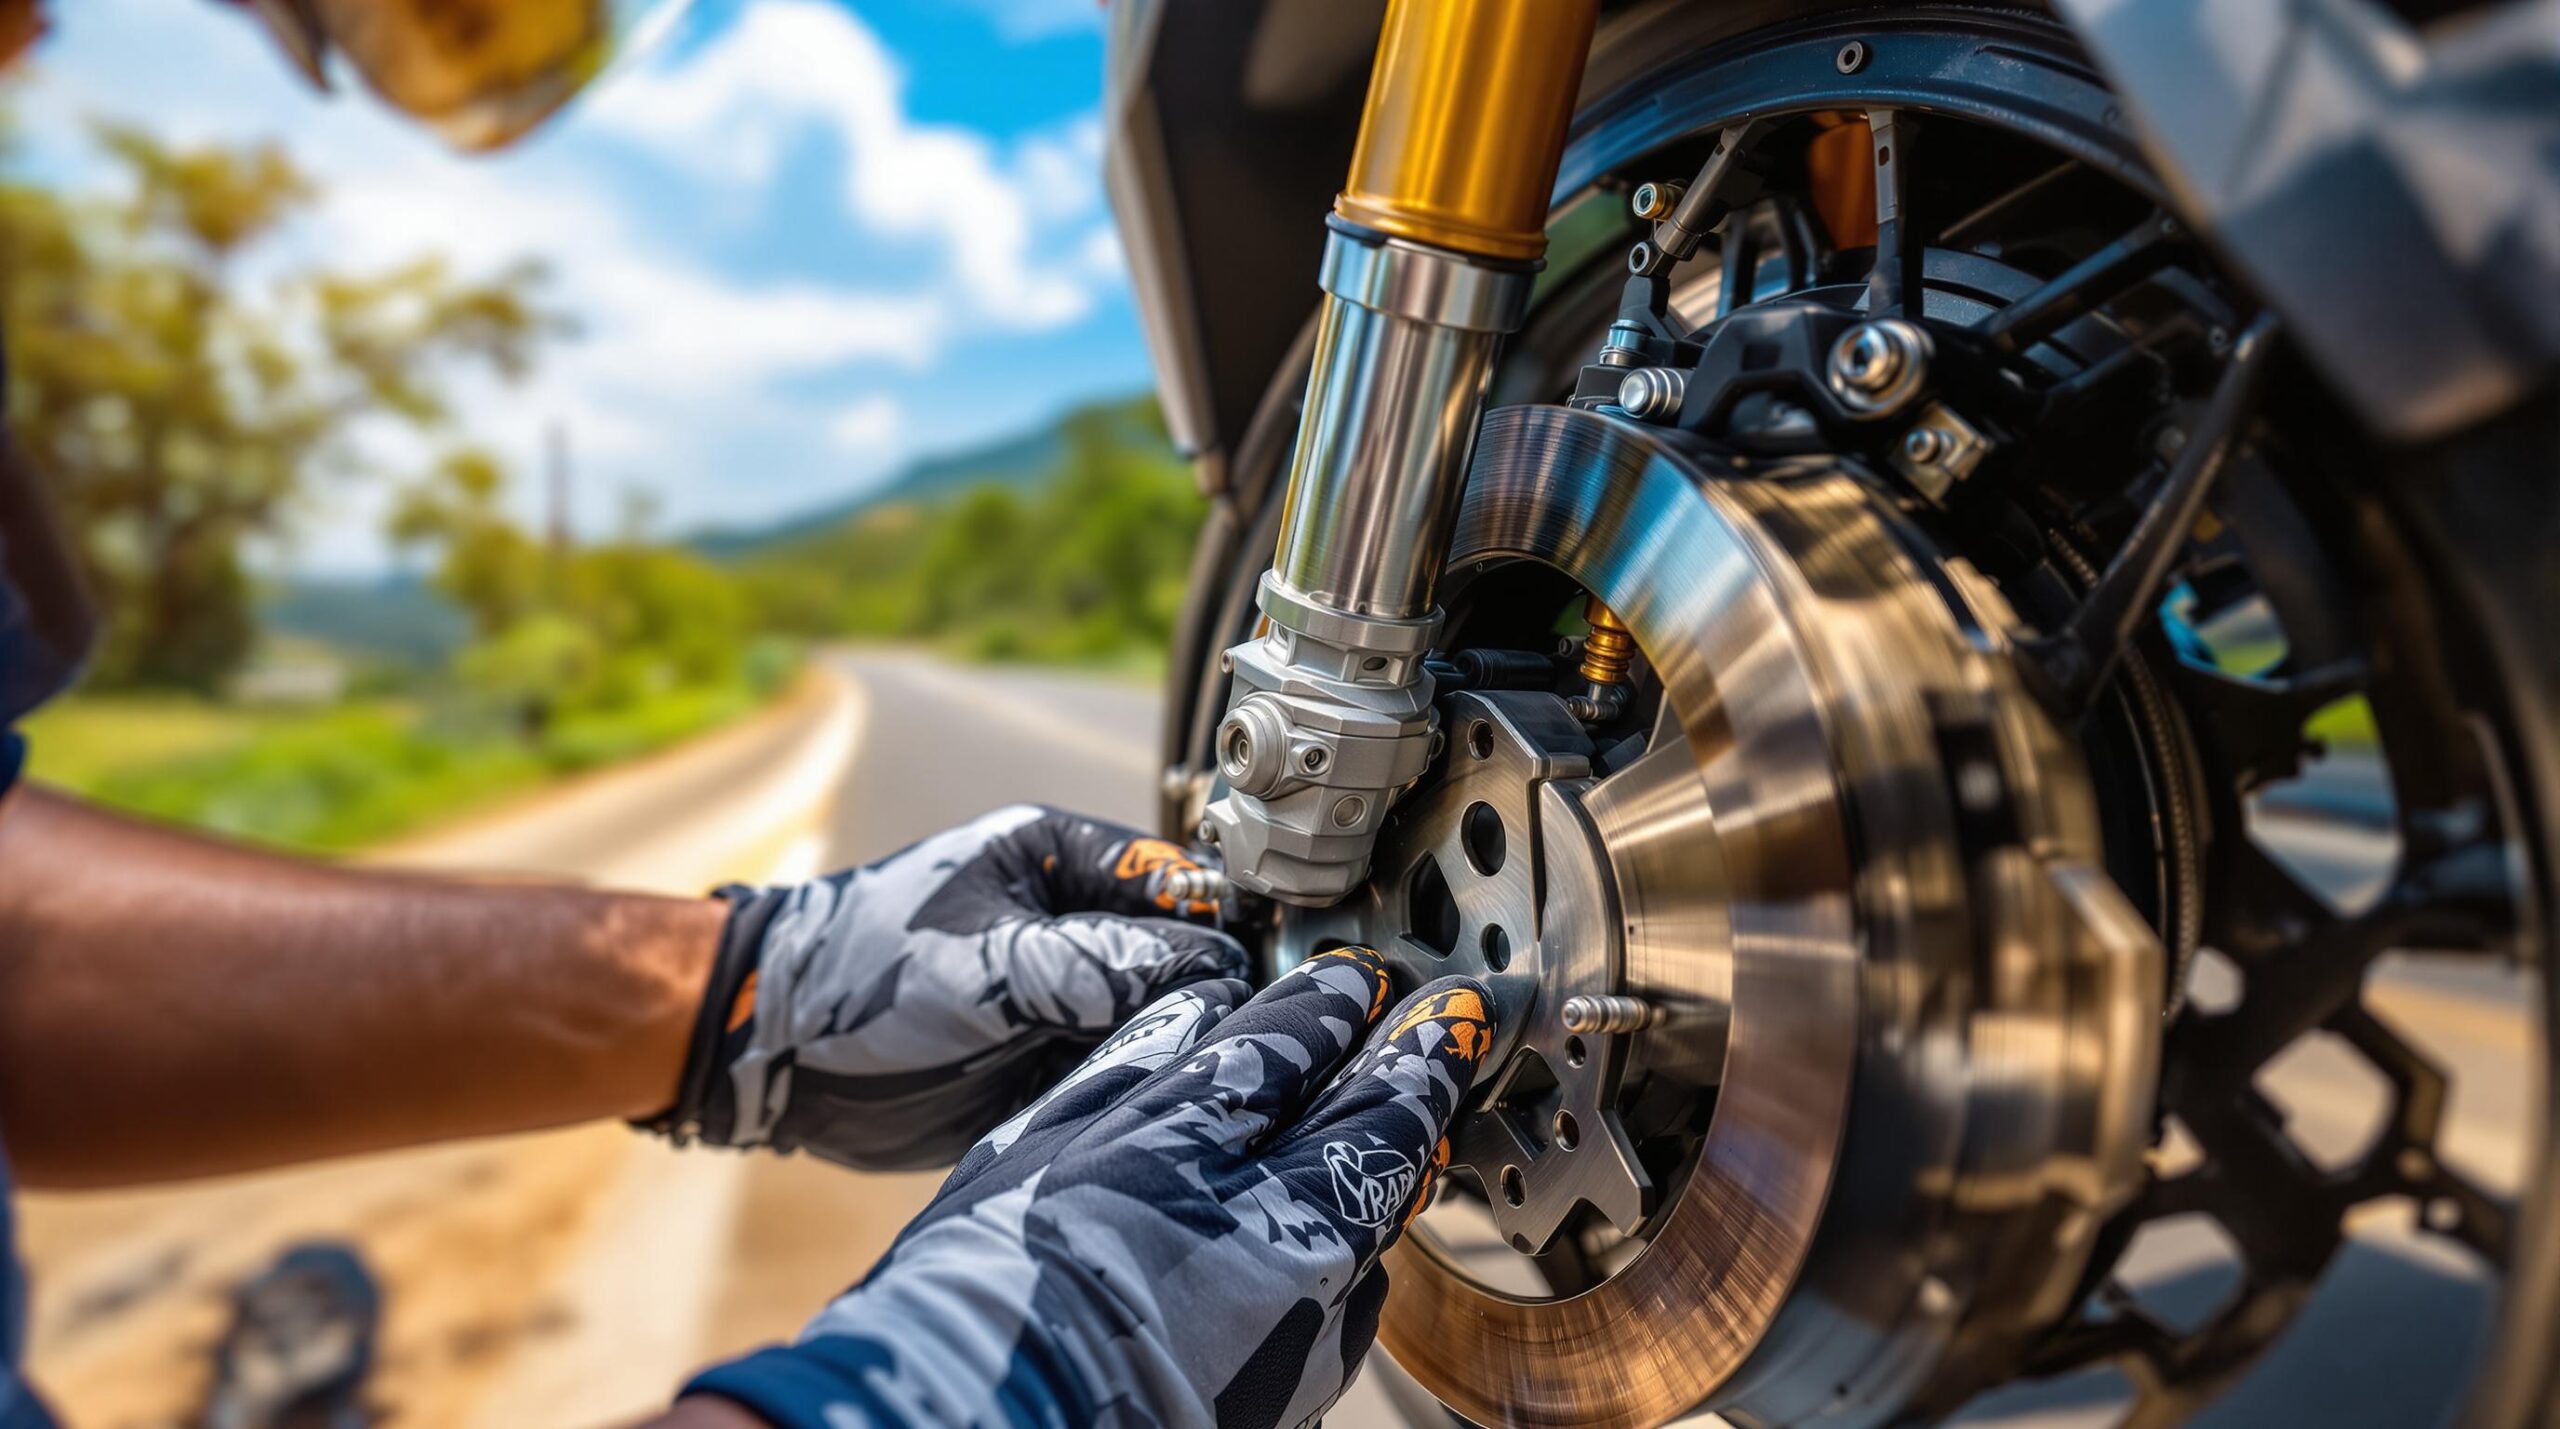
How to Check Your Motorcycle Brakes
1: Visual Brake Inspection
A quick visual check is the first step to ensure your motorcycle’s brakes are in good shape. With a torch, you can usually do this without needing to remove the wheel.
1.1: Check Brake Pads
Use a torch to inspect the brake pads. They should be at least 1.5-2mm thick, with visible wear indicator grooves and even wear on both pads. If the pads are thinner than the minimum or show uneven wear, replace them immediately [1][2].
1.2: Examine Rotors and Discs
Look closely at the rotors and discs for any deep grooves, cracks, warping, heat stress marks, or discoloration – these can signal overheating. If you spot any of these issues, replace the affected parts to keep your brakes working effectively [1][2][3].
1.3: Inspect Brake Lines
Check the brake lines for cracks, leaks, kinks, or signs of wear, especially around the steering head, swingarm, and connection points. Make sure the banjo bolts are tight and free of fluid residue. If you notice any damage or leaks, address them right away to avoid brake failure.
The Hawaii Department of Transportation highlights the importance of brake lines in maintaining hydraulic pressure, a critical part of your braking system [2].
After completing this visual check, it’s time to evaluate your brake fluid levels and condition.
2: Check Brake Fluid
Taking care of your brake fluid is key to keeping your motorcycle’s braking system working properly. It ensures your bike stops reliably and helps avoid brake failure.
2.1: Locate the Brake Fluid Reservoir
You’ll usually find the brake fluid reservoir near the brake master cylinder on the handlebars or close to the front brake caliper. It’s a translucent container with markings that make it easy to check fluid levels.
Before inspecting, make sure your motorcycle is on level ground with the handlebars straight. Wipe away any dirt or debris around the reservoir cap to avoid contamination.
2.2: Assess Fluid Levels and Condition
Pay attention to both the level and appearance of the brake fluid:
| Fluid Condition | What It Means | Action Needed |
|---|---|---|
| Clear/Light Brown | Fluid is in good shape | Just monitor regularly |
| Dark Yellow/Brown | Fluid is aging | Replace it |
| Below MIN mark | Fluid is too low | Refill immediately |
| Contaminated fluid | Fluid is dirty | Replace right away |
For a deeper check, use a brake fluid tester to measure water content. If water levels go above 3%, it’s time to replace the fluid [1]. Fresh brake fluid should look shiny and semi-transparent. A cloudy or murky appearance signals contamination.
2.3: Replacing Brake Fluid
Brake fluid should be replaced every two years or sooner if it’s contaminated. In hotter climates like Uganda, fluid may degrade faster, so more frequent checks are recommended [1].
Follow these steps when replacing brake fluid:
- Choose the right type: Look at the reservoir cap for the correct DOT specification. Most modern bikes use DOT 4 fluid because it has a higher boiling point [1][2].
- Prioritize safety: Wear gloves and wrap a towel around the reservoir to protect against spills, as brake fluid is corrosive.
- Consider professional help: If you’re not confident in your skills, consult a professional. Incorrect bleeding can introduce air into the system, reducing braking power.
Ignoring brake fluid maintenance can compromise braking performance and increase the risk of accidents. Once your brake fluid is in good shape, you can move on to evaluating how your brakes perform during rides.
sbb-itb-7bab64a
3: Assess Brake Performance
Once you’ve checked your brake fluid, it’s time to see how well your brakes actually perform. This step is essential for spotting potential problems before they become safety hazards, especially on Uganda’s demanding roads.
3.1: Test Brake Lever and Pedal Feel
Your brake lever and pedal should feel firm and responsive when pressed. Regularly checking these controls can help prevent accidents. If the lever or pedal feels soft, pulls too far, or has uneven resistance, it’s a sign something’s wrong. Common fixes include bleeding the brake system or inspecting the master cylinder.
| Warning Sign | Likely Cause | Action Needed |
|---|---|---|
| Spongy/soft feel | Air in brake lines | Bleed brake system |
| Lever pulls too far | Low fluid/worn pads | Check fluid/inspect pads |
| Uneven resistance | Master cylinder issue | Get a professional inspection |
3.2: Perform Stationary Brake Tests
With the motorcycle on its center stand or held upright, test the brakes one at a time. Apply the front brake, then the rear brake, and confirm that each wheel locks up as expected. Finally, apply both brakes together to ensure they work well in combination.
"A spongy brake feel is definitely something you don’t want to ignore. At best, it’s an annoying distraction, but at worst, it’s a major safety issue." – Demon Tweeks Expert [2]
3.3: Conduct Low-Speed Brake Checks
Find a safe, traffic-free spot to perform these tests. Start at walking speed (around 4 mph) and gradually increase to a moderate pace. Pay attention to the following:
- The bike should stop quickly without much effort on the lever.
- Brakes should respond promptly, with no grinding or squealing noises.
- The motorcycle should stop in a straight line, without pulling to one side.
If anything feels off during these tests, fix the issue right away – whether that means handling it yourself or taking the bike to a professional. Safety comes first!
4: When to Seek Professional Help
After inspecting your brakes, it’s important to know when it’s time to call in the experts. While regular self-checks are helpful, some brake problems require a professional to ensure your safety and avoid expensive repairs.
4.1: Recognizing Warning Signs
Certain sounds or behaviors mean you should get professional help right away. Here are some key warning signs to watch for:
| Warning Sign | What It Means | Risk Level |
|---|---|---|
| High-pitched squealing | Brake pads are worn down to the indicator | Moderate |
| Metallic grinding | Severe pad wear causing metal-to-metal contact | High |
| Soft/spongy brake lever | Air in brake lines or master cylinder issues | Critical |
| Brake fluid leaks | Damaged lines or seals causing fluid loss | Critical |
| Pulsating vibrations | Warped rotors or damaged discs | High |
"If you hear grinding, squealing, or other unusual brake noises, it usually means that the metal brake pad backing is rubbing against the rotor surface." – Bert’s Mega Mall [1]
4.2: Why Regular Servicing Matters
Routine professional servicing is key to keeping your brakes in top shape and preventing problems. Experts recommend inspections once a year or every 12,000–15,000 miles, though this may vary based on how and where you ride. Key services include checking brake pad wear, flushing the hydraulic system, inspecting calipers, and assessing rotors.
"Proper maintenance ensures a safer ride and prevents small issues from turning into costly repairs." – Demon Tweeks Expert [2]
Professional mechanics have the tools and expertise to spot issues like moisture in brake lines, measure wear accurately, and ensure everything is working as it should. Investing in a complete brake service now can save you from the much higher costs of brake failure or accidents later.
Conclusion: Safety on Ugandan Roads
Keeping brakes in top condition is critical for staying safe on Uganda’s roads. The rough terrain means brakes wear out faster, making regular checks a must. Uganda spends a staggering $1.2 billion annually – 5% of its GDP – on treating accident victims, underlining how essential it is to maintain motorcycles properly.
| Maintenance Action | How Often? | Why It Matters |
|---|---|---|
| Visual Inspection | Before each ride | Catches issues before they escalate |
| Brake Fluid Check | Monthly | Keeps braking smooth and reliable |
| Professional Service | Annually | Ensures the entire system works well |
Using antilock brake systems (ABS) can also make a huge difference. Research shows motorcycles with ABS are 37% less likely to be in deadly crashes compared to those without.
For more tips and advice tailored to Uganda’s road conditions, check out AutoMag.ug‘s guides on motorcycle maintenance.
Since motorcycle taxis (bodaboda) are a core part of Uganda’s transportation system, maintaining brakes isn’t just about personal safety – it’s about protecting everyone on the road. Regular checks and servicing can save lives.
FAQs
How to check brake pads without removing the wheel on a motorcycle?
You can easily check your motorcycle’s brake pads without taking off the wheel. Grab a bright flashlight and look through the brake caliper’s opening. Adjust your angle if needed to get a clear view. Make sure the pads are thicker than the minimum required and that the wear grooves are still visible [1].
Key things to look out for:
| What to Check | What to Do |
|---|---|
| Pad thickness less than 1.5-2mm | Replace them immediately |
| Wear grooves almost gone | Plan for a replacement soon |
| Uneven pad surface | Get a professional inspection |
For your safety, inspect the brake pads before any major ride. If the brake lever feels soft or the bike pulls to one side when braking, have it checked by a professional [1][2].
"Regular servicing is crucial to prevent accidents and ensure safety on the road. It helps identify and fix potential issues before they become major problems, ensuring the brakes function properly when needed" [1][2].
This simple inspection is especially helpful for riders tackling Uganda’s challenging roads, where brake pads can wear out quickly. Checking your brake pads regularly, even without removing the wheel, is an easy but essential way to stay safe on the road.
Related Blog Posts
- Used Car Inspection: 10-Point Checklist Before Buying
- Common Car Problems in Uganda: Solutions Guide
- 10 Safety Tips for Long Drives in Uganda
- How to Save Money on Used Car Maintenance


